Friday, 29 June 2018

How to send push notification in Blogger with One Signal

How to send push notification in Blogger with One Signal

Sending push notification in blogger just similar to push notification in mobile apps. Here we are going to tell you how you can send push notification in blogger with the help of one signal website. This is will enhance your traffic more on your blog or website. With this, you can send the push notification to all the user subscribed from your website.

Send Push Notification in Blogger with One Signal

STEP 1:

Go to one signal website. As we need to send push notification in blogger. So select Web Push option there.
How to send push notification in Blogger with One Signal


STEP 2:

Click on Sign up. Now Sign up using Google or facebook as you wish.
How to send push notification in Blogger with One Signal


STEP 3:

Now you will enter in the One signal dashboard. In the One Signal dashboard, click on Add a new app +.
How to send push notification in Blogger with One Signal 


STEP 4:

Now in a popup window, write the name of the blog and click on CREATE.
How to send push notification in Blogger with One Signal


STEP 5:

 In the next step to configure platform select Web Push there.
How to send push notification in Blogger with One Signal


STEP 6:

 In Choose Integration, Click on Wordpress plugin or Website builder option  (for blogger or WordPress).
How to send push notification in Blogger with One Signal


STEP 7:

 After clicking on Wordpress plugin or Website builder option, you have to select website builder their select blogger.
How to send push notification in Blogger with One Signal


STEP 8:

 Now in Blogger Site Setup, fill basic details, icons, and a Label which is same as domain, just take your website name there in Choose a Label option.
How to send push notification in Blogger with One Signal


STEP 9:

In Permission Prompt setup, click on ADD A PROMPT.
How to send push notification in Blogger with One Signal


STEP 10:

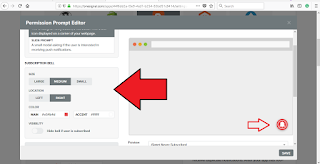
 After selecting ADD A PROMPT option, Either change the basic setting of the push notification bell icon or just click SAVE to take as the default setting. 
How to send push notification in Blogger with One Signal


STEP 11:

Now in the next step of Welcome Notification, If you want you can change the title and message which you want to show to your new subscribed users. If you don't know what to put leave it blank it will take the default.
How to send push notification in Blogger with One Signal

STEP 12:

Now you will the next option Add Code to Site, Copy the code from there and paste in the between the of your blogger theme. Blogger dashboard >> Themes >> Edit HTML >> search (Ctrl + F).

How to send push notification in Blogger with One Signal

STEP 13:

Open your blog and click on One Signal Bell and Subscribe as the first user to finish setup.
Finally all set, now go to your website and Now easily send the push notification to all your subscribed users. It is one of the most viral ways to make old visitors connected to your blog. This will enhance your traffic on blog easily.
How to send push notification in Blogger with One Signal


If you have any query or question regarding this post, feel free to contact us. Either comment in the comment box below or mail us at   techgridle@gmail.com.

Labels: , , ,

Tuesday, 26 June 2018

Top 10 Free Websites to Download Non copyright Free Images for blog or website


Top 10 Free Websites to Download Non copyright Free Images for blog or website


To enhance any article appearance the best way is to add  relevant images to the article because:

"A picture is worth a thousand words".

Top 10 Free Website's to download non-copyright free images  

3. Pexels
9. Fotor


You might have noticed that we use images with all the articles in our blog to make articles more attractive. There are many images available online but it is important that you use only those images on your blog or for another project which are allowed by the owner to be used.

Now how to get no copyright images for your blogger is an important question.


Top 10 Absolutely Free Websites to Download Non copyright Free Images for blog


So, in this blog, we are going to tell you the best website from where you can get high-quality images which are free to use in your blog.

Here are the best free Websites for downloading Free images: CCO licensed

1. Pixabay :

Top 10 Absolutely Free Websites to Download Non copyright Free Images for blog


After trying Gratisography, I got really includes to use beautiful looking stock images
Apart from the quality content, it is important that we must take care of the presentation of the article too. To enhance any article appearance the best way is to add a relevant image to the article because:
A picture is worth a thousand words


You might have noticed that we use images with all the articles in our blog to make articles more attractive. There are many images available online but it is important that you use only those images on your blog or for another project which are allowed by the owner to be used.

I’m not going to talk about image licensing here and straight away share my list of Websites to download free stock photos. Yah, you heard me right and it’s completely free.


Here are the best free Websites for downloading Free images: CCO licensed


2.Flickr :


Flickr is one of my favorite website to search and download free images for websites. It has a huge database of royalty free images and whenever I am in hurry to download any image for my article then Flickr is the website which I visit. To download any image you just need to visit creative common category and search for an image, you will get lots of relevant images of different size and you can download any image which suits your article. You can read more about Flickr in following articles:

    How to find images for your blog using Flickr
    How to drive huge traffic from Flickr
Search for free stock photos using Flickr advanced search

3. Pexels :

Top 10 Absolutely Free Websites to Download Non copyright Free Images for blog

Blogging free image

All pictures here are licensed under Creative Commons Zero (CC0) license, that means you can use these images for commercial uses too. The CC0 license was released by the non-profit organization Creative Commons (CC). Every month they add 1500 new HQ photo & right now they boast about having more than 10k+ pics.


4. Stock snap :

Top 10 Absolutely Free Websites to Download Non copyright Free Images for blog


This is another free stock photos site where you can download high-quality pictures for free. All images are licensed under CCO license (Same as above).


5. Morgue-File :

Top 10 Absolutely Free Websites to Download Non copyright Free Images for blog


Morgue File is one of the best free Stock image sites, which makes it easy to search the images via category. You can select the category of images to make them more relevant search. It has a clean and clutter-free landing page and easy navigation. It gives you the option to crop the image at the same time and makes it easy to post on your blog. You can read more about Morgue File in the review of Morgue File.


6. Free-Range-Stock :

Top 10 Absolutely Free Websites to Download Non copyright Free Images for blog


You can download images from Free-Range-Stock for personal and commercial use. To download free images you need to first do a quick and free registration on Free-Range-Stock website. Apart from downloading images, if you are a photographer then you can also upload the images and earn money with their Adsense revenue sharing program.  You can also edit directly on Pixlr before downloading it on your computer. The only thing which you might not like about Free Range stock is the interface, as it’s quite old and is not so friendly. Though at the price of zero, would you really mind it?


7. Free-Digital-Photos :

Top 10 Absolutely Free Websites to Download Non copyright Free Images for blog


Apart from downloading free royalty images from Free Digital Photos, you can also download Powerpoint, Word, Educational projects, Photoshop projects and more for personal and commercial use. It also provides greeting cards but it’s not allowed to use for commercial use. Thus if you are looking for something more than just images then do head to Free Digital Photos.


8. Photogen :


Photo-gen also provides free images for personal and commercial use. Photo-gen provides you with categories of images such as animals, cultures, nature, business etc. You can select the one suits your requirement. Photo-gen provides very relevant search and good quality images. It is simple to use and easy to search for free images.

9. Fotor:


This is another popular site where you can find 335 MILLION Premium Royalty-Free Stock Photos From The Fotor Community. Though it requires attribution.

10. Stock Photos for free :

Top 10 Absolutely Free Websites to Download Non copyright Free Images for blog

This is another popular Website which let you download free stock photos for your personal or commercial use. You can create a free account and start downloading images right now. You can also mark images as favorite and download it later.

Browse the site

When you are not in the budget and need free images for your project, above mentioned free sites will work as a rescue. Make sure you read every site terms of usage to be clear about where you can use or where you can’t use these download images. Most of them don’t allow using downloaded images for the pornographic site or for the trademark.

Related Article must read :
How to Compress any  image without loosing its quality.(reduce image size upto 90% from original)


Check out another popular post on Blogger tutorials CLICK HERE.


If you have any query or questions related this post write to us, in the comment box below or mail us at   techgridle@gmail.com.
Labels: , ,

Monday, 25 June 2018

How to compress image size without losing quality


How to compress image size without losing quality
Compress any image size without destroying its original quality. These are some of the best web application and Desktop application which help you to decrease the size of the image without destroying its quality. It basically reduces the image size by 30 to 35% of the original image size.

Why we need to compress image?
It is obvious that visitors spend more time on websites or blog which loads faster and have good visibility. To improve the website loading time, Web developers need to look at so many things including the number of loading resources, page cache, number of JS (JavaScript)/CSS files, HTTP requests, media files of less size etc. There are so many online free SEO tools available to measure the performance of your website or blog. Media files such as images are one of the most important parts of a website as it tells everything about your website or webpage, but at the same time, images are the bulkiest resources which take time to load on a webpage. If you can decrease the size of images by 25 – 30%, it will absolutely improve the website load time by a significant amount. Adobe Photoshop is having a nice feature to save the optimized version of images especially for web, but for this, you need to spend a big amount on purchasing Photoshop desktop application or the web version. In this post, we have listed few awesome and free online/offline tools to reduce image (JPEG, JPG, PNG) size by up to 80% to 90% without much effort and also without destroying its image quality.

Image compressing is an important task for SEO ranking, A website which loads faster have a good visitors count and watch time. A website which loads faster has high ranking than those websites which take a lot of time to open and load images.

Web Applications (websites)


1. kraken
2. imageoptimizer
3. smush
4. tinypng
5. compressjpg
6. punypng
7. jpegmini

1. kraken.io – If you need a free online application to compress image formats like JPEG, PNG, GIF, SVG to a point where the image doesn’t lose on quality, then it will be the best choice for you. we tried this application with an already compressed image using a desktop application, the result was unbelievable Kraken.io compress that image which is already compressed to an extra 10% without losing its quality. Firefox and Chrome extensions are also available for this application.

2. imageoptimizer.net – This is also a good platform for image compressing, you can upload the image from your local computer and give the image quality and size that you need. Image optimizer provides features (very limited) on the output and compression ratio.

3. smush.it – smush is one of a very popular website for compress images. There is uploader as well as URL box to provide the image. but there is no way to set the output quality, the smush.it uses auto-optimization for the image and compress the image to a limit which does not destroy it's quality.

4. jpegmini.com – To compress JPEG images up to 5X, you can checkout this tool. It also work similar to other web application upload the image from local computer compress it and download final output.

5. punypng.com
– To compress PNG files, you can try punypng.com. Upload the image (PNG only) from the local computer and get the download of compress version of the image.

6. compressjpg.com and compresspng.com – For more control on the last result’s quality, I would suggest you to use this application. Once you upload the image from computer, a slider appears to auto-control the quality of the last image. There is a preview panel showing the changes according to the quality slider change, and there you can see the final image quality before downloading the image. There is a zoom-in/out feature also available in the preview where one can see the quality of the image pixel by pixel. Application is available on different domains for JPG and PNG images.


7. tinypng.org - Tp compress PNG images for the best level without affecting it's quality, you can try this tool also.


Desktop Applications (softwares)


1. IrfanView (for Windows platform available)
2. Trimage (for Linux, Windows, Mac platform available)
3. ImageOptim (for Mac platform available)
4. GimpShop (for Windows, Linux, Mac platform available)


1. IrfanView (for Windows platform available)  – To compress single or multiple images (bulk processing) than it can be a better choice for you, this is a must have tool if you are a web or app developer. You get full control for resizing the image compressing the images to its extent.

2. Trimage (for Linux, Windows, Mac platform available)
– It is a cross-platform tool for optimizing PNG and JPG files. You can find the details on its GitHub page.

3. ImageOptim (for Mac platform available) – An amazing tool to optimize or compress the images. But it is currently available only for Mac platforms.

4. GimpShop (for Windows, Linux, Mac platform available) – It is one of the very popular and free alternative of Adobe Photoshop with so many tools to work on images including compression tool. Try out this tool.


If you have any query or question related this post, you can comment us in the comment box below or mail us at techgridle@gmail.com.

Labels: ,

Sunday, 24 June 2018

How to show Live Cricket Scores in Blogger or Website

How to show Live Cricket Scores in Blogger or Website

Want to show live cricket scores on your blogger, here we are providing the solution for this query just follow few steps which are explained below with images. As cricket sports is one the most popular sports which have huge fans if you have this feature on your blog then it directly reflects on the traffic on your blog. So just follow these steps to show Live Cricket Scores in Blogger.


STEP 1: 

Open your blogger dashboard and Goto Layout Section of your blog
How to show Live Cricket Scores in Blogger or Website


STEP 2: 

Now choose a place where you want to show LIVE Scores . and  Click on add a gadget.
How to show Live Cricket Scores in Blogger or Website

STEP 4: 

In the popup window select HTML & JavaScript tool.
How to show Live Cricket Scores in Blogger or Website

STEP 5: 

Now copy the code given below.


STEP 6: 

Paste the above code in the Html & JavaScript tool and click on Save. And also click on Save Arrangement on the top right of the window.
How to show Live Cricket Scores in Blogger or Website
Finally, all set, to show live cricket scores, Now view your blog for testing this widget.


If you have any query or question related this post, write to us in the comment box below or you can mail to us at techgridle@gmail.com


Labels: ,

Saturday, 23 June 2018

How to see all saved password in Chrome browser


How to see all saved password in Chrome browser - chrome browser tricks
How to see all the saved password in Google Chrome browser, the solution is here follow these few steps which are explained with images to view all your saved password of the different website you accessed from chrome browser.


Step 1: 

Open your chrome browser and open menu which is present in the top right corner of the screen


Step 2: 

Now in the drop-down list search Setting option, and click on Setting.


Step 3: 

In the new setting window, click on the Advanced option. Present in the mid of the window as shown in the image above.


Step 4: 

Now after selecting the Advanced option, Click on Manage passwords.


Step 5: 

Now finally you will see all the accounts with their password. Click on eye button to view the password.


With these following steps, you can easily view all the passwords saved in Chrome browser.

If you are using Firefox browser and want to see your saved password in Firefox browser then    CLICK HERE 

How to find all saved password in Firefox browser.


Check out other popular Computer posts: Check out here


If you have any query or question related to this post write to us in the comment box below or mail us at   techgridle@gmail.com

Labels: , ,

How to Repair Corrupted Pendrive or memory card using Command prompt | techgridle

How to Repair Corrupted Pendrive or memory card using Command prompt

Is your pen drive corrupted? So, here is the solution to repair your corrupted pen drive using the command. If your pen drive is of 4GB or more and showing only some MB's then this problem can be 100% solved by this trick. This is one of the most powerful ways to repair your corrupted pen drives easily and fastly. Just follow few steps which are described below with images.


STEP 1:

How to Repair Corrupted Pendrive or memory card using Command prompt
Open Start menu and click on Search button. Now type CMD there.

STEP 2:

How to Repair Corrupted Pendrive or memory card using Command prompt
It will show command prompt, Right click on Command prompt and click on Run as Administrator.

STEP 3:

How to Repair Corrupted Pendrive or memory card using Command prompt
Now in the command prompt, type diskpart and hit enter.

STEP 4:

How to Repair Corrupted Pendrive or memory card using Command prompt
Then type list disk and hit enter.

STEP 5:

How to Repair Corrupted Pendrive or memory card using Command prompt
Now it will display the details of all the partitions present, Correctly identify the partition of pen drive and type select disk _ ( _ indicate the partition no. here). Kindly see image careful to understand more clearly.


How to Repair Corrupted Pendrive or memory card using Command prompt

STEP 6:

How to Repair Corrupted Pendrive or memory card using Command prompt
Then type clean and hit enter

STEP 7:

How to Repair Corrupted Pendrive or memory card using Command prompt
Type create partition primary and hit enter.

STEP 8:

How to Repair Corrupted Pendrive or memory card using Command prompt
Type active and hit enter.

STEP 9:

How to Repair Corrupted Pendrive or memory card using Command prompt
Type select partition _ ( _ indicates partition no. here), for example, see image above carefully.

STEP 10:

How to Repair Corrupted Pendrive or memory card using Command prompt
Now type format fs=fat32 and hit enter. Formatting process starts. When it reaches 100%, finally ends up with a message Disk part successfully formatted volume


How to Repair Corrupted Pendrive or memory card using Command prompt
Now when the process is 100 percent complete, that means the process is completed successfully.

STEP 11:

How to Repair Corrupted Pendrive or memory card using Command prompt
Now at the end type exit and hit enter . to come out of this window.


Now check your pen drive, all the problems are fixed and it will start working normally.

If you want to remove the virus from pen drive using command prompt then click here.

If you have any query or question related this post you may write to us in the comment box below or mail us at techgridle@gmail.com

Labels: , ,