Friday, 30 November 2018

How to add CSS in Blogger template - Easiest Method | techgridle

How to add CSS in Blogger template - Easiest Method | techgridle
 In this post, you will learn how you can add CSS codes in your blogger in an easy method without searching the correct place where you can add CSS in you Blogger codes in the HTML section of the theme.
Just follow some basic steps that are described below with images. And you will able to add CSS to the blogger. This is the best method through which you can add CSS in just a few clicks which will really save your time in searching the correct place and pasting it.


How to add CSS code to Blogger template - Easy method

Follow these steps to add any CSS code in your Blogger easily.

STEP 1:
How to add CSS in Blogger template

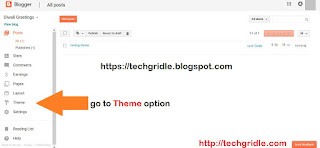
Login to your blogger dashboard.


STEP 2:
How to add CSS in Blogger template

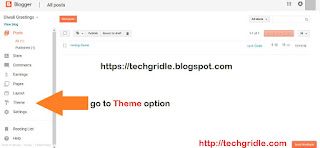
Now go to Themes option


STEP 3:
How to add CSS in Blogger template

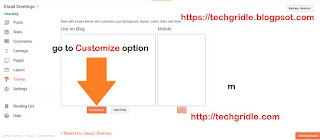
Now you will get two option there, that is Customize and Edit HTML. Click on the Customize option there.


STEP 4:
How to add CSS in Blogger template

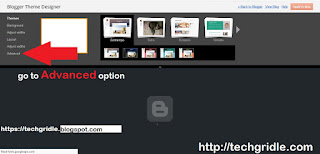
Now, in the Blogger Theme Designer window click on Advanced option present in the blogger theme designer window.


STEP 5:
How to add CSS in Blogger template

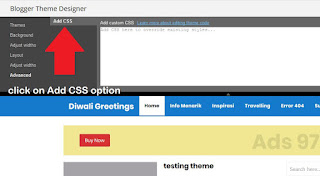
Now after clicking Advance option, find Add CSS option there and click on the ADD CSS option.


STEP 6:
How to add CSS in Blogger template

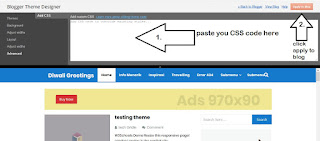
After clicking Add a CSS option, paste your CSS code in the section provided there and click on Apply to Blog option present in the top right corner.


Now you completely Added a CSS code to your blogger.  This is one of the easiest methods by which you can add CSS codes to your blogger with few steps.
If you feel this post helpful to you, share with your friends.

Labels:

Monday, 26 November 2018

How to create responsive code box in blogger - pre tags - one click select all | techgridle

Sometimes you have to write code in your blog posts just like we do in our posts when we need to share any kind of widget on our blog for our readers and to separate that code from the text, we use code box in our posts. So that’s what code boxes are mostly used for.


In this post, we will help you create responsive code boxes in Blogger using a specific HTML tag called pre tags. These codes boxes are responsive that is on click it will select all.


This tutorial is going to be a really simple and basic but I am still sharing it for beginners or newbies who don’t even know the basics of HTML and CSS or who are still in learning stage. Creating code box in Blogger is a bit of tricky too and I will also share that tricky part in the end so keep reading!


How to add code boxes in Blogger:

STEP 1:

  •     Go to your Blogger dashboard.
  •     Then, go to the Theme option there.
  •     Click on Edit HTML option present there.
  •     Now, search (Ctrl + F) their tag and just paste below code just after and click on SAVE.


  •     Finally, the first step is completed.


STEP 2 :


  •  In the blogger dashboard >> Themes >> Edit HTML >> find a code there ( Ctrl+F key ).
  • Now search for  ]]>
  • And just above this tag paste anyone CSS code given below

**if you are facing problem in adding CSS code then try an alternative method

How to insert CSS code in blogger | easiest way  (click to view article)

Above that tag paste the following CSS code.


STYLE 1:
How to create responsive code box in blogger - pre tags - one click select all | techgridle


STYLE 2:
How to create responsive code box in blogger - pre tags - one click select all | techgridle


STYLE 3:
How to create responsive code box in blogger - pre tags - one click select all | techgridle


When you have successfully added any of the above CSS codes then Save your template!

STEP 3:

Now when you need to share codes on your post then you need to add code in a systematic format explained below:

While writing the blog post, when you need to add code in your post then you will write or paste your code just like normal text in Compose mode and then you will switch to the HTML mode of your editor and enclose that code in

the tag is shown below!


Labels: ,

Saturday, 10 November 2018

How to add responsive featured post slider in blogger | techgridle

How you can create a Responsive featured post slider in blogger

How to add responsive featured post slider in blogger - techgridle

In this post, we are going to tell you, how you can add responsive post sliders on your blogger website. You just need to put a simple code in your widget to start a responsive featured post slider in your blogger. As the slider is the most attractive part for any website where visitor stays little more to view whats next coming.
To put this responsive featured post slider in your blog, you need to follow some simple steps which are described below with images.


STEP 1:
Go to your blogger dashboard and click on layout option present in the blogger dashboard.
How to add responsive featured post slider in blogger - techgridle


STEP 2:
Now click on Add a gadget. 
How to add responsive featured post slider in blogger - techgridle


STEP 3:
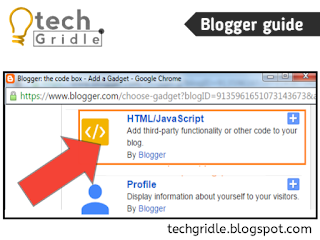
Now select HTML/javaScript option present there.
How to add responsive featured post slider in blogger - techgridle


STEP 4:
Copy the code given below (if code is not displayed click on get code). You need put your blog url in the code. See that given code has some red lines change that.


STEP 5:
Now paste this code in the HTML/JavaScript option. and click SAVE

How to add responsive featured post slider in blogger - techgridle
 Finally on SAVE ARRANGEMENT option to save the blog layout. Now it is completed view your blog to see changes.


:: NOTE :: 
YOU NEED TO CHANGE LITTLE CODE GIVEN 

  • listURL - replace "https://techgridle.blogspot.com/" with your blog URL
  • featuredNum - add the number of posts to display in the slider
  • listbyLabel - if you want to display posts by category / label, such as the tag fashion, it will be written as listbyLabel: "fashion"
  • feathumbSize - the size or dimension of the image in pixels
  • interval - time taken to change the slides position in milliseconds
  • autoplay - replace true with false if you don't want the slides to change automatically.

Labels: , , ,

How to Add Facebook Message Box In Blogger | techgridle

How to Add Facebook Message Box In Blogger


If we want to receive direct messages from your website or blog to your Facebook page, then you need to add a facebook comment box to your blog or website. Which make your blogger or website more professional. In this post, we are going to explain you with images, how you can do this.
How to Add Facebook Message Box In Blogger | techgridle
So, how you can put facebook message box in blogger is explained below


STEP 1
Login to blogger. and go to layout option in the blogger dashboard.
How to Add Facebook Message Box In Blogger | techgridle

STEP 2
Now in slidebar, Click on Add a Gadget option.
How to Add Facebook Message Box In Blogger | techgridle

STEP 3
Now choose HTML/Java script option there
How to Add Facebook Message Box In Blogger | techgridle

STEP 4 
Now copy the code given below. 


STEP 5
Now paste this code in HTML/JavaScript option there. and click on Save, finally on save arrangement.
How to Add Facebook Message Box In Blogger | techgridle

Now it is finally complete, view your blog to see changes.

Labels: ,

Sunday, 28 October 2018

How to Submit Sitemap of blogger website to google search console | techgridle

How you can Submit your blogger sitemap to google search console?

How to Submit Sitemap of your blogger website to google search - techgridle

Here we are going to tell you the solution to this problem. But before we start you must know what is actually a sitemap. As the word sounds, a sitemap is actually a map of your website. A sitemap is basically of two types, that is HTML sitemap, which helps the visitors on your site to navigate your post easily. and the other type is XML sitemap, that basically helps the search engine crawl your website.
So after this coming to the point, here we are going to use XML sitemap which will be submitted to Google Webmaster Tool.


PART 1
SUBMIT ALL POST SITEMAP TO GOOGLE SEARCH CONSOLE
How to Submit Sitemap of blogger website to google search - techgridle


Step 1: Sign in to your  Google account
Step 2: Open Google webmaster tool webiste
Step 3: Select the desired blog you wish to submit the sitemap for
Step 4: At the left side of the page, click on Sitemaps under Crawl section.
Step 5:  Now, at the top-right corner of the page, click on Add/Test Sitemap button.
Step 6: Add the below code in the provided text field.

atom.xml?redirect=false&start-index=1&max-results=500

This is the sitemap code for your blogger blog that you need to add.
Step 7Press “Submit Sitemap” button.
Step 8: Refresh the page.
Congratulation! You have finished the process of submitting your blog sitemap.


Part 2
Submitting Blogger Static Pages Sitemap in Google Search Console
  1. Go To Google Search Console (Google webmaster tools)
  2. Choose your blog from the list provided
  3. Choose Crawl >> Sitemaps from the left sidebar menu
  4. Click ADD/TEST SITEMAP button towards yours top-right side
  5. Now Paste the below Code in the text box.  
sitemap-pages.xml

Now click on submit. That completed finally. Now your post and pages are successfully added to the google search console.

Labels: , ,

How To Add Code Box In Blogger Posts | techgridle

How To Add Code Box In Blogger Posts

You have noticed that some educational website or blog displays programming codes in a specific manner, that is in a box. Which make it more attractive and looks pretty good. In this post we are going to tell you how you can do that. Just follow these simple steps : -


Step 1 : Adding CSS code to Blogger


1. Login to your blogger blog Dashboard.
2. Then go to " Theme " > " Edit HTML ".
3. Click anywhere inside the code area and press Ctrl + F keys to open the search box.
4. Write or paste " ]]" code in search box and press Enter.
5. Just above " ]] " paste the code box CSS code given below:

Code 1:  For Style 1 Copy This Code [With Scroll]

 .code{ background:#f5f8fa; background-repeat:no-repeat; border: solid #5C7B90; border-width: 1px 1px 1px 20px; color: #000000; font: 13px 'Courier New', Courier, monospace; line-height: 16px; margin: 10px 0 10px 10px; max-height: 200px; min-height: 16px; overflow: auto; padding: 28px 10px 10px; width: 90%; }
.code:hover { background-repeat:no-repeat; }

 Code 2:  For Style 2 Copy This Code [Without Scroll]

.code { background:#f5f8fa; background-repeat:no-repeat; border: solid #5C7B90; border-width: 1px 1px 1px 20px; color: #000000; font: 13px 'Courier New', Courier, monospace; line-height: 16px; margin: 10px 0 10px 10px; min-height: 16px; overflow: auto; padding: 28px 10px 10px; width: 90%; }
.code:hover { background-repeat:no-repeat; }

6. Now click on " Save Template " and you completed.

NOTE : If you facing problem in pasting this CSS code in you blogger than try another simple method. Click below :

 How to add CSS code in Blogger Post (click here)


Step 2: How To Use This

To use this in your post just follow the following steps:

1. To use this just click on HTML tab in your blogger post editor.

2. Now write or paste the code given below in your blogger post editor as shown in the image below:


how to add code box in blogger post - techgridle

3. Replace " Your Code Here " with your desired code.

4. Now click on " Publish Button " and see it live.

Labels: ,

Thursday, 2 August 2018

How to embbed a custom comment box in blog or website - Disqus comment box

How to embbed a custom comment box in blog or website - Disqus comment box

Want a professional comment box in your blogger or wordpress website. Here we are telling you how you can embedd a disqus comment box in your blogger or wordpress for free. This is an amazing tool, which you must have it in your blog or website to create a bridge with your visitors. The visitors of your website can easily connect with you and can share their problems, feedbacks and queries with you or other visitors.

So, now follow these following steps which are expained below with images for embedding disqus comment box in your blog or website for free.


STEP 1:


How to embbed a custom comment box in blog or website - Disqus comment box


Firstly, visit to the disqus official website. And click on Get Started button present in the homepage of disqus website.

STEP 2:


How to embbed a custom comment box in blog or website - Disqus comment box


Now you can see the Sign up form, Sign up there with your Google, Facebook accoutn as you wish .


STEP 3:

How to embbed a custom comment box in blog or website - Disqus comment box


After Signing up, In the new window Click on the I want to install Disqus on my site option .

STEP 4:

How to embbed a custom comment box in blog or website - Disqus comment box


Now in this new window, put your website URL and category of your website.


STEP 5:

How to embbed a custom comment box in blog or website - Disqus comment box


After this step you will see a new window, which will tell you all the plans of disqus choose according to your need , If you want a free version of disqus choose Basic plan and Click on Subscribe Now

STEP 6:
How to embbed a custom comment box in blog or website - Disqus comment box


Now, In the next window you have to choose your platform where you have to put disqus comment box.

STEP 7:
How to embbed a custom comment box in blog or website - Disqus comment box


Finally its completed, Click on Add (name) to my blogger site. And put in that section where you want to show disqus comment box on your blog or website.

Labels: ,

Tuesday, 3 July 2018

How to make your blog or website instanly available in 90+ languages

 Is your blog or website ready to deliver content to the world. Make your blog or website instantly available in more than 90+ languages with GOOGLE.
Is its true create your website in one language and can be converted in any language instantly in 90+ language. You can deliver your knowledge or service to the world. As this is a free tool provided by google.

How to make your blog or website instanly available in 90+ languages


How to make your website ready for 90+ languages, just follow out these steps which are explained below with images.


STEP 1:

Goto the Google Translate   website on your browser.
How to make your blog or website instanly available in 90+ languages

STEP  2 :

After opening the above link, Add to your website now option will apear on the screen. Click on it.
How to make your blog or website instanly available in 90+ languages


STEP 3 :

In the next step put your blog or website URL (eg. www.example.com). And select language in which your blog is written originally. and click Next.


How to make your blog or website instanly available in 90+ languages


STEP 4 :

Now In the plugin step, You need to set languages in which you want to translate your website (recommended: select All languages), and the set the display design according to your choice. and click on Get Code.

How to make your blog or website instanly available in 90+ languages


STEP 5 :

Now in the Add Plugin step, Copy the code given below and Goto your blogger dashboard now.

How to make your blog or website instanly available in 90+ languages


STEP 6 :

In blogger dashboard, goto Layout section and In sidebar (where you want to display translate option) click on Add a gadget.


How to make your blog or website instanly available in 90+ languages


STEP 7 :

In the popup window, select HTML/JavaScript.

How to make your blog or website instanly available in 90+ languages


STEP 8 :

Paste the code there and click save. Finally all set now view your blog to see this feature.
How to make your blog or website instanly available in 90+ languages


If you want to get traffic from all over the world on your website or blog, then Google translator tool is an essential feature in your blog.


If you have any query or question regarding this post kindly mail us at  techgridle@gmail.com

Labels: , ,

Friday, 29 June 2018

How to send push notification in Blogger with One Signal

How to send push notification in Blogger with One Signal

Sending push notification in blogger just similar to push notification in mobile apps. Here we are going to tell you how you can send push notification in blogger with the help of one signal website. This is will enhance your traffic more on your blog or website. With this, you can send the push notification to all the user subscribed from your website.

Send Push Notification in Blogger with One Signal

STEP 1:

Go to one signal website. As we need to send push notification in blogger. So select Web Push option there.
How to send push notification in Blogger with One Signal


STEP 2:

Click on Sign up. Now Sign up using Google or facebook as you wish.
How to send push notification in Blogger with One Signal


STEP 3:

Now you will enter in the One signal dashboard. In the One Signal dashboard, click on Add a new app +.
How to send push notification in Blogger with One Signal 


STEP 4:

Now in a popup window, write the name of the blog and click on CREATE.
How to send push notification in Blogger with One Signal


STEP 5:

 In the next step to configure platform select Web Push there.
How to send push notification in Blogger with One Signal


STEP 6:

 In Choose Integration, Click on Wordpress plugin or Website builder option  (for blogger or WordPress).
How to send push notification in Blogger with One Signal


STEP 7:

 After clicking on Wordpress plugin or Website builder option, you have to select website builder their select blogger.
How to send push notification in Blogger with One Signal


STEP 8:

 Now in Blogger Site Setup, fill basic details, icons, and a Label which is same as domain, just take your website name there in Choose a Label option.
How to send push notification in Blogger with One Signal


STEP 9:

In Permission Prompt setup, click on ADD A PROMPT.
How to send push notification in Blogger with One Signal


STEP 10:

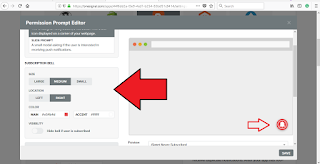
 After selecting ADD A PROMPT option, Either change the basic setting of the push notification bell icon or just click SAVE to take as the default setting. 
How to send push notification in Blogger with One Signal


STEP 11:

Now in the next step of Welcome Notification, If you want you can change the title and message which you want to show to your new subscribed users. If you don't know what to put leave it blank it will take the default.
How to send push notification in Blogger with One Signal

STEP 12:

Now you will the next option Add Code to Site, Copy the code from there and paste in the between the of your blogger theme. Blogger dashboard >> Themes >> Edit HTML >> search (Ctrl + F).

How to send push notification in Blogger with One Signal

STEP 13:

Open your blog and click on One Signal Bell and Subscribe as the first user to finish setup.
Finally all set, now go to your website and Now easily send the push notification to all your subscribed users. It is one of the most viral ways to make old visitors connected to your blog. This will enhance your traffic on blog easily.
How to send push notification in Blogger with One Signal


If you have any query or question regarding this post, feel free to contact us. Either comment in the comment box below or mail us at   techgridle@gmail.com.

Labels: , , ,